Day after day we keep hearing about companies that need to reduce their costs in order to stay competitive. More people are getting laid off from their employers. At the same time, costs for services keep rising. The cost of health care continues to rise. If companies are reducing the labor in their workforce, I think we would expect the cost of services to go down too. This is not the case.
I would think that costs would be coming down for everything, including services. Instead service costs keep rising, taxpayers pay for subsidizing companies, and companies lay off workers to reduce costs. This does not make sense. There is no competition and responsibility for good management if bankrupt corporations can just be bailed out. The electronic digits that represent the national debt continue to have no affect on those who freely spend it for us without our consent. I have had no say in corporate bailouts, wars, stimulus plans, or healthcare reform.
Sometimes I think that the only sustainable occupation is to start a small farm and become a farmer. I mean small scale. I would grow my own organic food utilizing crop rotations each year. I would have a cow, chickens, bees and pigs in a small barn. Compost and manure would be used as fertilizer. I would have eggs, milk, cheese and vegetables where I knew the origin of each before I put in my mouth. Exercise is replaced by fulfilling manual work out in the sun. Healthy food would be my healthcare plan. I am good with my hands and can build and repair things. Off-grid energy can also be sustainable on a farm by growing energy crops. I know this would not be easy getting started. It would be better to live on an existing family farm for a few years to learn the ropes first. This is my plan if I get laid off. I don’t know what else would work in the current conditions of our country. I don’t know how our currency is maintaining any value at this point. Those who are self-sufficient and can provide value from their own labor and land will become the new currency.
I know I should be happy living the American dream. I am grateful that I live like a king compared to the major portion of the human race. I have a modest house but it is clean, dry and warm. I have clean water, hot water, computers, sanitation system, garbage removal, televisions, cars, woodworking equipment, books, refrigerator, health-dental-vision care. I should not have a care in the world.
However, this American dream is very stressful to live out. At any moment without notice, it can all be taken away. Each day brings more fear that this will all end because I know I am riding a wave that is unsustainable. I have no debt other than a small amount remaining on the house mortgage. We live well below our means. I wonder which is better, to live without fear and have nothing or to live with constant fear and have everything?
I don’t know who is benefitting from the cost reductions that layoffs supposedly bring. I no longer invest in the stock market. It is based on the game of chance and promises you that it will create value for you without any effort on your part. This is a big myth. It is a game that cannot be won. I read that layoffs are needed to please the customers and shareholders. Tell me, as a customer and a shareholder if you have been pleased lately with the millions of layoffs that have occurred this past year alone in order to reduce costs?
I think I am beginning to realize that everything does work in perfect order without my help. If this current model is unsustainable, it cannot be propped up no matter how many trillion pieces of federal reserve notes are printed out. I have been a participant in the current model and take responsibility for where we are now. I cannot blame anyone as it is no one’s fault. There is nothing to forgive. I can be glad because a new model must be about to arrive, because it is arising in my consciousness. If I can see it, the world sees it because the world is me. It will be good because that is what the Creator is. When thought changes, then the only thing to layoff is being afraid.
Wednesday, December 16, 2009
Wednesday, December 9, 2009
Stitch and Glue Guideboat Project

This is my latest boatbuilding project. It is a stitch and glue Adirondack Guideboat and the plan was from John Gardiner. Stitch means the panels are held together with wires that are spaced every 12" or so. Then thickened epoxy is put in between the stitches to tack the boat seams together. The wires are then cut and pulled out. Then a thickened epoxy fillet is put down along the entire joint. 6 ounce fiberglass tape is put down over the epoxy and then the glass tape is epoxied. This is what is meant by "Stitch and Glue". It is messy but a fairly quick way to get a hull built. I really liked the design that John came up with based on Dwight Grant's "Ghost". I will be posting more on the progress of this boat in the next few months. I have always loved the guideboat design but hesistated to build one because of the time commitment (300+ hours) and >$1000 in material for a cedar strip version over laminated frames. One day I may do that but I can't now. This boat should take about 100 hours to build. I plan to launch it in April 2010.

This is a picture of my friend Steve, who has a kevlar Adirondack Guideboat made by Steve Kaulback. Steve is a fantastic rower with incredible strength and endurance. He leaves me in the dust in his boat while I tag along behind in my Natoma Skiff. He has let me try his boat a few times and I can really tell the difference in speed, tracking and glide compared to my homebuilt Natoma Skiff. It is by far the best boat I have ever rowed by far. It looks great too. Steve's kevlar boat is what gave me the idea to build John Gardiner's guideboat. Hopefully in 2010 I will be able to keep up with Steve a little better. Guideboat against guideboat, I will have no more excuses.
Student of the Month

Here is my son James getting a "Student of the Month" award in November 2009. The school awards students each month who exhibit a particular characteristic during the month. He won for "Respect". Congratulations James!
Transporting Thin Plywood on Roof Racks


Here is how I transported my precious Okoume marine plywood home after driving 96 miles each way to Harbor Sales in Maryland. I made a 4' x 8' frame out of 2" x 3" x 8' wood and put on top of Sears roof racks. I picked a bad day to do it. It was rainy and wind gusts were 30-40 mph. My transport carrier made it home thankfully. At times I was nervous due to the wind slapping noise of the plastic sheeting that was covering the plywood. The plastic took quite a beating but managed to keep most of the sheets dry. I used rachet straps to hold the plywood down. This was the only way I could have transported this thin material by car. Without this carrier, the thin plywood would have flapped around and probably would not have made it. After spending over $200, I wanted to make sure it was secure. This set up worked well and I would use again if needed. This wood is being used for my new stitch and glue guideboat project. More on that later.
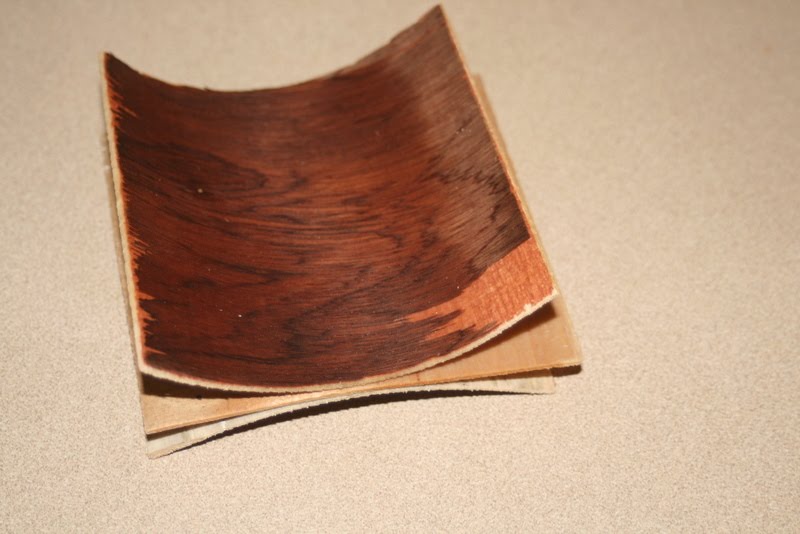
Boatbuilding Plywood - Okoume


Here is a 3' square of Okoume plywood. It is a sample from 4' x 8' panels that I purchased at Harbor Sales in Maryland. I drove down to pick up 4 sheets. Each sheet was $50. I put this square to the boil and freeze test like I did with the cheap Meranti plywood from Home Depot. The okoume survived 3 cycles of boiling for 20 minutes, then freezing solid overnight. It remained perfectly flat with no signs of delamination. It would have survived more cycles too. I am glad that I decided to use it. It was more expensive, but well worth it.
Saturday, October 31, 2009
Cutting Thin Plywood


One of the problems when working with plywood is that you get bad tear out of the plywood surfaces when cutting with a saw. When cutting out long curved panels, I have to use a jigsaw. I saw a good idea about making a zero clearance base for the jigsaw. I made one and it works great. It also helps to use a blade with at least 18 TPI (threads per inch).
Boatbuilding Plywood


I am starting a new boatbuilding project this fall and it will be made out of 1/4" plywood. One sheet of Okoume plywood costs about $50 and I need (4) sheets. I found this meranti plywood at Home Depot for $10 per sheet. Looks great and said it is exterior grade. It has 3 equal thickness plys but has a paper thin veneer on each side. I read about a boil and freeze test for plywood in Sam Devlin's book on Stitch and Glue boatbuilding. I cut a 3" square and boiled it for 20 minutes and then put it in the freezer to freeze it solid. I did this for three cycles and it delaminated by peeling apart. I will not use it for a boat but it was worth a try to find out if it would work. I also do not like epoxy gluing to a paper thin veneer that could peel also. I would recommend staying away from this even though it is tempting. Epoxy is not a cure all for bad plywood.
Monday, August 17, 2009
Bicycle Commuting
I try to ride my bicycle into work every day that I can. This usually averages out to 3 days per week. I started doing this in 2006 and have continued each year since then. My riding typically starts in April and ends around beginning of November. My commute is only 7 miles each way and I can make this trip in under 30 minutes. It is a great way to get in exercise each day. It only takes ten minutes more each way to ride versus the car. The car is used if there is rain or if I have to run an errand that is out of the way. Last years I logged about 1,300 commuting miles on my bike which was a record for me.
Riding a bicycle is a wonderful way to slow down and notice everything around. Right now it is very warm outside and I feel the heat off of the road. I also feel the cool of the big stands of trees or woods when passing by too. A tree is an incredible air conditioner and I would not notice it each hot summer day by riding in my air conditioned car. Today I heard strange bird sounds and looked up at the tree tops. Sitting on top of a tree was a peregrine falcon. I stopped just to look at it and then it flew away. On my ride home, I often will smell many different dinners cooking from homes along the route home.
These are a few benefits of the enjoyments of riding a bicycle to work each day. It does help to have one less car on the road and I hope more people can enjoy this experience too. Not to save the planet or save gas, but just for the simple fun of it.
Sunday, August 2, 2009
Back to Pencil Drawing

This is a pencil drawing of the late George Harrison that I started last year which I worked on during lunch times at work. I had in my desk drawer and pulled it out occasionally. It was not coming out like I hoped so I put it away. Two weeks ago I saw it and decided to finish it. I have learned more about seeing value shapes but I still have much more to learn. I recently came across an artist named JD Hillberry. I really like the detail that he captures in pencil and charcoal. I ordered his book and pencil set. I hope to improve the realism in my drawings. It will take lots of practice, but I am enjoying it. I just need to get over the resistance to just sitting down and drawing.
Wednesday, July 22, 2009
Internet Time and Money Drain
It is amazing how much time can be spent surfing the internet. I just go in to check my gmail account and then 1 or 2 hours will go by in the blink of an eye. I realized I must be very careful with it, especially since my free time is impacted. If I do not go in with a plan, I get sucked into endless links of things to explore. I am now going to approach it like going to the grocery store. There are candy aisles, things good for you, things bad for you, things you need, things you don’t need, and it is all carefully placed and subtlety marketed. Most people realize (or not) that you have to go in with a list and stick with it. Otherwise your time and your money will be gone. It is the same or more so with the internet. The internet is really still very new and cool to anyone who is not under 20. It is hypnotic in a way. It morphs and grows everyday so all the possible hyperlinks to visit will be harder and harder to resist. You need to go in with a plan and stick with it. This became even more clear to me when I use the internet at work during my half hour lunch break. It is over in a split second and I usually have to extend my lunch break to finish. I compare this to if I go for a walk or read a book at lunch time. It seems like I actually did something.
Here is a possible solution. I keep a paper list of sites that I think of during the day that would be good to explore later. I seem to really like lists. Checking off a box and crossing off an item on a list feels great. It supposedly sends a “feel good” chemicals to your brain. The object then becomes completing the list according to my plan rather than mindlessly surfing and being pulled into what someone else wants you to see. Try it out and see if it frees up some more of your time to do something more useful. If you just view the internet as entertainment and don’t want to structure your time on it that is fine. Just understand if you have less free time and money where it might be going.
Here is a possible solution. I keep a paper list of sites that I think of during the day that would be good to explore later. I seem to really like lists. Checking off a box and crossing off an item on a list feels great. It supposedly sends a “feel good” chemicals to your brain. The object then becomes completing the list according to my plan rather than mindlessly surfing and being pulled into what someone else wants you to see. Try it out and see if it frees up some more of your time to do something more useful. If you just view the internet as entertainment and don’t want to structure your time on it that is fine. Just understand if you have less free time and money where it might be going.
Sunday, July 5, 2009
The Venus Project
The Venus Project
I came upon a great video that I recommend everyone see. I saw the original Zeitgeist Movie, but this is even better.
Zeitgeist Addendum
Check the movie out first, then visit The Venus Project site for more information.
I came upon a great video that I recommend everyone see. I saw the original Zeitgeist Movie, but this is even better.
Zeitgeist Addendum
Check the movie out first, then visit The Venus Project site for more information.
Tuesday, June 30, 2009
Riding A Bike


My son James just started ride a bicycle without training wheels. He has made great progress over the last month. We started out on 5/23/2009 and have been doing a little practice each day. On 6/26/09, he was riding successfully on his own. Great job James!
Cellphone for $7.12 A Month
I don't work for any cellphone company and this website is not affiliated with any company either. I want to share a low cost method of having a cellphone. First, I am not a big cellphone user. I only keep with me for emergencies. I may only use about 10 minutes per month if that. I realize this may only apply to a select few these days as more and more people become dependent on these devices.
I bought a TracFone for $9.95 at Target. Then I have been purchasing a 60 minutes TracFone card for $21.35, tax included. This card will expire after 90 days, so it is $21.35 divided by 3 months = $7.12 per month.
People may think this is out of the question by having a cellphone for emergency use only. But if you are looking to reduce your monthly expenses, why not give it a try for a few months? I still don't understand why people have to be on the phone all the time. A man at work was sitting on the toilet and took a call at a work location bathroom the other day. He could not even get some peace in the crapper! Please!
Friday, June 12, 2009
Gas Grilling - Weber Baby Q 100
I just tried out the little Weber Baby Q 100 gas grill. I really like the design of this grill and have had an eye on one for about a year now. I have enjoyed charcoal grilling for many years now and have become quite good at it. I decided to get a gas grill to have for those times when you need to grill quickly. I bought this unit last week and really like the looks and design. However, it turned out to be like a George Foreman grill that uses propane gas instead of electric. The grate is cast iron and heavy, so this heated up is how it cooks, rather than a flame or heat from below. I cooked hot dogs one day and they were burned even on low setting. The next day I cooked hamburgers. I was not impressed. It tasted like I cooked inside in a pan and you get that sour smell of meat cooked on a big mass of iron.
I cannot recommend. I will stay with a charcoal grill. It is cheap, simple and easy. The taste from charcoal cannot be replicated by indoor cooking too.
Instead of this unit, you can buy a cheap flat iron griddle with raised ridges on it and cook on the stove. Much cheaper and it will be the exact same taste. Easier to clean up too. Grease gets everywhere on this Weber unit and I had ants all inside it the next day. At least my curiosity about gas grills is satisfied. Never again!
Sunday, May 17, 2009
Air Rocket Fun


I came across a wonderful website last week named Science Toymaker . I have been doing elementary school presentations on space topics such as rockets for many years now. My son asked me when I would be coming to his school. Since he is in first grade, I had to think of some great demonstrations. I saw homemade water rockets but the launching mechanisms looked complicated or it was something I had to send away for. Then I came across Science Toymaker. This website has two great rocket projects, with each costing no more than $5 and uses recycled soda bottles. I was able to make the air rocket project in a few hours. The air rocket you see here goes up about 100' and is made out of a rolled up magazine page, fins and plastic wrap balled up on top. No kidding! It is great. On Friday, I used at my son's first grade glass and about 42 students tried it out. It really worked out great and the water rocket is even better. The water rocket 2 liter bottle can go 100' but it can send a water balloon shooting up 300' or more when held in a payload cup on top. Check out the instructions and other projects Science Toymaker .
Saturday, May 2, 2009
Don't Plant In A Garbage Pit
As you may have already guessed, planting in a garbage pit is not a good idea. The pile got hot, as a compost pile is supposed to, and killed off my Highland Star Seed Selke cherry tomato plant that I raised from seed. I was really disappointed! I have no backup plan. I did learn though that I needed to trust my better judgement. I knew that planting in uncomposted material is incorrect, but I still did it anyway believing the directions on the 2,000 tomato producing plant package. I still have seeds, but will have to try again next year, 3/7/2010. I will use the same pile, but it will be well composted by then.
We probably won't be wanting for tomatoes this year. I have 4 plants in the ground already of different varieties. I am going to plant another 4 plants today. I will post more on this later this summer with reviews on the taste of different varieties.
Don't plant in uncomposted food scraps, hay and manure. Duh!
Tuesday, April 28, 2009
Planted First Tomato in Garbage Pit


Yesterday I planted our first tomato plant. It is a Selke cherry variety that I purchased from Highland Star Seed. I started it from seed on 3/7/09. I found out about this tomato in the "grow a tomato from garbage" video on YouTube. Well, not really garbage, just any organic kitchen scraps, horse manure, grass clippings, weeds, compost, leaves, etc. The instructions say it does not have to be fully composted either, just dump it all in as is. My son and I dug a hole according to the instructions. The hole is 2 feet deep, 3 feet wide and the pile is over 2 feet high. This plant is supposed to yield thousands of tomatoes. Well see. I am doing it as an experiment because I was so intrigued by the idea. It seemed legitimate. I will document here and we can all find out if I can have similar success. The website for the seeds and instructions is McKean County Biodynamics.
Saturday, April 25, 2009
Hammock

This is a Byer of Maine hammock I just bought. It was very inexpensive and weighs just 11 ounces. It is made of parachute material. I have never been in a hammock before but this is terrific. My son loves it too. It is so comfortable. I plan to sleep in it some night. You lie diagonally in it, which allows you to remain fairly flat. I don't have anything to gain by recommending it. I just think it is a great product and hope others can try it out. It does have a 250 pound weight limit. They do sell heavier duty versions of it. This now provides another sleeping option for our house that is comfortable and really cheap. It probably is not something to use everyday, but it is great for naps and just relaxing. Who would have thought? Who says you need a Sealy Posturpedic or Sleep Number bed at $2000 for a good rest?
Fixed Gear Bike

This is my fixed gear bicycle. I transformed it in 2006 from a 1982 Fuji Royale 12 speed. It has IRO wheels on it which are excellent wheels. While it was fixed at a single gear (42-15 cog), it still had brakes on it. I have about 700 miles on it after fixing it. I have noticed fixed gears bikes are becoming more and more popular. I really enjoy it. There is no coasting though and no brakes. "Fixed" means the pedals are always turning either forward or backward. You use your legs to pedal and slow down. Just last week I made the final move to remove the brakes after seeing several messengers in Philadelphia a few weeks ago. It is dangerous, but I no longer commute with this bike. I use my Cannondale, road bikes with changeable gears and brakes. This bike is just now for fun around town and riding slow with my son. I really like how it looks. Stripped down and simple. Not much to go wrong with it. Perfect!
A Different View of Dandelions


I happen to like dandelions in my yard. I know I am one of the few. I love this time of year when I have the yellow of the dandelions, purple wildflowers and green grass (or weeds) is in the yard. What a great color combination of nature! Actually a dandelion is a soil builder and the leaves are edible. It sends down a very deep root which will eventually rot and add humus to your soil. A dandelion is natures way of improving hard soil. It grows, sends down a deep root spike, it rots, adds humus in that spike. Then it provides some free food for you too in it's leaves. When you understand this, it does not make sense to spray dandelions killer and then rent an airating machine to punch plug holes in your lawn. Dandelion leaves can be a delicious salad. All for free. No starting seeds indoors, no hardening off, no putting up fences to keep pests out. Edible salad leaves in abundance in the yard and I did nothing for it.
I have not put any chemicals on my lawn for about 7 years now. I know my soil is improving. It has lots of worms in it and there are many bees all over the dandelions. It is a real marvel what nature does all on it's own. We just need to stop abusing it with chemicals. We don't know much about the teaming abundance of life under our feet in the soil.
Sunday, April 12, 2009
End of Hydroponics for Me

Here is a picture of my Burpee Sun Gold cherry tomato plant in my Hydrofarm after 2 weeks in the chemicals. The end of the leaves are curling up, drying up and falling off. The plant has plenty of moisture and I have followed the directions exactly. These symptoms probably can only mean too much fertilizer. I used the most diluted concentrations too for just establishing growth. The plant still may have been too young to take any food. It is now set back about 2 weeks to recover and I probably should start over again with a new plant due to the stress.
My other tomato seedlings in potting soil are doing wonderfully and they were incredibly easy. Hydroponics on the other hand is expensive, time consuming, power intensive (bubbler pump running) and high maintenance. The solution requires a full flush out and replacement every 2 weeks. You have to check the pH regularly. You know what? Forget it! The good thing about what I learned from this experience is that regular soil gardening is so much easier. "Feed the soil, not the plant..." says organic gardener, Eliott Coleman. Hydroponics goes completely against this philosophy.
This now convinces me to continue now completely in the direction of organic gardening, biodynamics, and permaculture which are all sustainable practices. I was never comfortable with all of the chemistry involved with hydroponics and it did not seem right. I guess I got caught up in the gadgetry of it all. I have to remember to always keep it simple.
I will clean up and put on ebay this week.
Saturday, April 11, 2009
Cheap and Easy Power Washing

Here is my version of power washing equipment for house, siding and decks. You were probably expecting to see a Troy-Bilt pressure washer unit with a Honda engine on it complete with an on-board detergent tank. I almost got suckered into buying one for $350 but thought there had to be a better way.
A neighbor had a local man power wash their ranch house and fencing for $250+. He had been doing this each year for about 10 years. We were asked if we wanted our house cleaned by him too and we got an estimate. We almost went through with it. I don't like to deny local business people a chance to earn a living but this was a bit extreme for pricing. I went out to look at pressure washers at Lowes and almost bought one. I held off though. Something did not seem right.
Today I decided to keep it simple. I bought 2 brush heads (1 course for decks and 1 soft for siding), and an extension pole for $30. I filled up a bucket with a very diluted solution of Simple Green. I sprayed down the porch siding, windows, soffets and front face of gutters. I went over all surfaces with the brush and hosed off. It took all of 45 minutes to do. I don't think a pressure washer would have been faster and maybe slower. I found a great solution. No exhaust or loud noises either.
I also feel good about not having to buy another gas powered piece of equipment that I have to: store, maintain and wear ear protection to operate. I will go around my house and do a little each day. Eventually I will get it done. I will also get some exercise and maybe help show a few others that it pays to keep things simple.
Sunday, March 29, 2009
Vegetable Seedlings - Growing Our Own


I have now transplanted all of my seedlings to larger containers. It really does make a difference to get the seedlings into larger 4" containers after about 2 weeks, especially tomatoes. I was able to compare sprouts still in 1" flats to sprouts transplanted into 4" pots or cartons. The result was almost double. This showed me that it is the soil that is important and not the fertilizer. Elliot Coleman states to feed the soil, not the plant for best results. Once in the ground, I plan to only feed with compost tea and compost.
Here you can see my set up in the basement with the hydroponic container at the bottom. I am running out of room so I plan to move the larger plants into the hoophouse in the next week or so. I have tomatoes, broccoli, green pepper, lettuce, and snapdragons growing here.
My complete list is:
(5) Broccoli - Burpee green goliath
(4) Green Pepper - Burpee California Wonder
(2) Tomato - Brandywine heirloom
(2) Cherry tomato - Peacevine heirloom Freedom Seeds
(2) Selke cherry tomato - Highlands Star seeds heirloom
(6) Cherry tomato - Burpee hybrid Sun Gold
(4) Cherry tomato - Burpee hybrid Sweet Baby Girl
(7) Beefsteak Tomato - Conway organic heirloom
(2) Tomato - Cherokee Purple heirloom Freedom Seeds
(4) Tomato - Burpee hybrid Steak Sandwich
Hydroponic Cherry Tomato


Today I transplanted a Burpee Sun Gold cherry tomato seedling (started 3/1/09) to the Hydrofarm hydroponic garden bubbler. The reservoir is filled with 2.5 gallons of water that I let sit outside for a few days to evaporate any chlorine that was in the city water. I added 7.5ml of General Hydroponics FloraGro and stirred it in well. Then I added 7.5ml of FloraMicro stirred it in and then 7.5ml of FloraBloom. You must stir in at separate times per instructions. These amounts are for a mild growth for the next week or so. I will change the amounts to a more aggressive growth next. I did not want to burn out the little seedling at first since this is my first experience with hydroponic growing. I checked the pH and it was right at 6.0 (exactly yellow color).
I am using a Burpee hybrid terminator seed, which means the seeds cannot be saved from the tomatoes for next year. In the future, I would only like to grow non-hybrid and heirloom varieties in order to be able to save seeds. I had read many good things about Burpee's Sun Gold and Sweet Baby Girl cherry tomatoes that I had to try them.
Right now I have a singe fluorescent light about 12" above the plant. I will move closer in the next few day. I will run the bubbler all the time at first, but may shut off at night once I know it is well established and the roots are into the solution.
Friday, March 20, 2009
New Style Workbench


I saw this workbench in Fine Woodworking's Tools and Shops winter 2008/09 issue no. 202. There was an article on how to build it by Joshua Finn, who is a woodworker in High Falls, NY. He freely gave all the dimensions and pictures on how to build it. I saw the magazine earlier this year and thought the workbench idea was excellent. It is easy to build, inexpensive and can be taken anywhere in the shop quickly. The two 8' benchtop beams and be put end to end for a 16' long bench. The stands can be positioned to any number of locations. The beams can be put close together or separated for clamping up parts. One side of the beam is melamine (I used birch ply) and the other side is homosote, which is not MDF board. Homosote is soft and light. It is used if you have a nice wood piece that you want to finish. It has some gripping power too.
Well, after thinking about it more and seeing the magazine each time I went to Lowes, I decided that I wanted to build it. I had a huge, heavy 12' long bench with an uneven top that I inherited from prior owners of our house in 2001. It was too big and became a collector for junk instead of a useful shop tool. I trimmed this old bench down to 3' long and made into a table for my drill press and grinder. The rest of the bench went to my recycled wood pile and some was used for this new workbench.
It took me about 1 week to build. I used recycled wood that I had from the old bench and other pieces in the garage. I spent about $70 for birch ply, homosote and screws. Although the birch ply looks nice finished with linseed oil, I would not recommend. Finn recommends and used melamine for his materials. My birch ply was not flat so it had to get screwed down with lots of persuasion and clamping to bring together. The beam now is OK for flatness, but not flat like I would have gotten with melamine. I can always make another beam though. Melamine is not expensive and would have been cheaper than birch ply. The beam is a torsion box with ribs every 12" inside. I may put up an instructible on how I made it. I love this workbench because it has so many uses.
Saturday, March 7, 2009
Indoor Grow Lights and Hoophouse


Here is a picture of my grow light set up in the basement. I have two shop lights with GE Kitchen and Bath fluorescent tubes. These tubes proved to be the best for plants when compared with other fluorescent tube lighting (see this link for the comparison test) Wayne's This and That. It is getting crowded under the lights and soon I will be transplanting to 4" pots. I am experimenting with lettuce, tomatoes, cherry tomatoes, broccoli, and peppers. The two green jugs on the right are lettuce growing into a hydroponic solution. I also have some tomatoes starting in rockwool cubes. These will be transplanted into my hydroponic grow farm and there will be more on this later.
Today I made a small, 4'x4' hoophouse. This will be used to harden off my plants prior to planting in the ground. I probably will be able to start putting some plants out in the hoophouse in April. You will see a Witten automatic black vent. I bought this from Ace Hardware outlet Ace Hardware outlet online for about $13 including shipping. This vent automatically opens at 70 degrees and closes at 40 degrees. There is a temperature sensor and no batteries or power is needed to do this. I thought this would be perfect for the hoophouse to protect the plants. I do have extra plants that I can try out to see if they survive under this protection.
I used 2x4 for the bottom hoophouse frame and 3/4" outside diameter PVC pipe. The plastic sheeting is 4 mil bought in a 10'x25' roll. Total is about $25. I will have to see how well the plastic holds up this season. I also am considering a small hobby greenhouse.
Friday, March 6, 2009
Making a Mini Soil Blocker

Here is my latest entry to Instructables on how to make a mini soil blocker Making a mini soil blocker. After 2 weeks from seed planting, this soil block should be transplanted to a larger 2" soil block or container. The nice thing about this method is that root disruption is minimized.
Tuesday, March 3, 2009
Lightweight Canoes


Here are two more boats that I have built. The 13' cedar strip canoe is a design called "Wee Robbie" by Rob Macks of Laughing Loon. I built it in 2005 and weighs about 30 lbs. The 12' white dacron geodesic airolite is a design called Nimrod by the late Platt Monfort. I built that in 2006 and it weighs about 14 pounds. To see constructions pictures of these boats at my Flickr page, see Cedar Strip Canoe and Ultralight Monfort Boat.
Wall Desk and Bookshelves


I built this for my son's bedroom. It was inexpensive, fairly easy and does not involve bulky furniture. It is adjustable so as he gets bigger, the desk top can move up. The project cost was approximately $90 and I did on a Saturday. I put finish on the wood after installing it on a Sunday. Total time about 4 hours. The only power tool needed is a power miter saw. Borrow one if you don't have. You don't need a table saw. Just get it cut down at Home Depot or Lowes. The cut panels are easier to bring home in a small car too. You have to use the double pronged shelf supports. The single prong supports are much too flimsy.
Here is my instructable or "how to" article on how I made it:
Wall Desk and Bookshelf Unit
Monday, March 2, 2009
Yankee Stadium Memories
The following are my recollections about trips to the old Yankee Stadium. I will really miss going there. I am really grateful to have seen it pre-1973 prior to renovations.
June 24, 1970 - First game at Yankee Stadium. Bobby Murcer hits 4 home runs in the double header. Steve Hamilton strikes out a batter on a folly floater and batter crawled back to dugout. Firecracker lands in Ray Fosse's leg and he does a backwards somersault when it goes off. Vada Pinson gets into fight at home plate. Walking up the tunnel and seeing the friese and field for the first time was a great thrill.
Yankee stadium tour with my brother, Gib. We went through clubhouse, press box, dugouts and monument park with Tony Maranti.
Second yankee stadium tour in 2002 with Gib. We brought a ball and mitts and had catch on warning track in outfield. We walked on the warning track out to monument park.
Dad, Gib and I visited yankee stadium in 1973 during start of demolition. Went in visitors dugout, home plate and mound. My Dad bought two box seats for $25 each.
I went to Manny's baseball land under subway outside stadium to buy Pirate yearbook in 1972.
We went to Mickey Mantle memorial day after he died on August 1995. Number 7 was painted on field.
My wife's first game at Yankee Stadium against Oakland A's ALDS game #2. The Ticket sold to me was for game #1 by accident but i still used it and got in. I got $350 back and it was a good thing since Roger Clemens was bombed that night and they lost.
June 17, 1978, vs. California Angels. Ron Guidry strikes out 18, and Joe Rudi 4 times.
Reggie Jackson gave the finger to the crowd at a game we attended in 1977. I cannot remember the game date. My brother witnessed this too but it was never written or heard about again. Can you imagine is A-Rod did this today?
Gib met Reggie Jackson and gave him a painting. Reggie went and got a ball which he signed for Gib.
The 1978 championship season was really exciting and we rode up to many games in a 1967 red volkswagen with Gib. Baseball was still affordable for us as young fans.
Opening day against A's in 1997 where the championship banner was raised.
Soil Block Making

What are soil blocks? I first learned about soil blocks after watching The Real Dirt on Farmer John movie. He uses them and then I saw that Eliott Coleman recommends them. A block of soil is made and with the right mix will hold together during root growth. Once the roots grow into it, it will be more solid. It eliminates the need for flats, peat pots, paper pots and any other pot which can get root bound. In the soil block, roots will air prune and not go beyond outside. It is a messy operation, but for those who like to tinker with things in their workshop, I made a 2" and 3/4" blocker to try out. If I am successful this year with it, I may invest in the square soil blockers sold on-line. The cheap plastic flats are really easy though so I am not sure what I will eventually settle with.
Shown here is a 2" soil block maker that I made. I started out with a 2" V8 can and then I tried the PVC pipe. You can check out my Making a Soil Blocker instructable on how to make this.
Spring is almost here. Time to get start planting seeds, especially tomatoes and peppers. This is the first year I am attempting to start from seeds. Why go through the trouble when you can buy little plants so cheap at garden centers? Well, I thought about it and you can't always find varieties that you may want. You get generic hybrid plants that are crowded into little rootbound flats. I will be posting my experiences with this this spring and summer to see the results. I have been doing lots of experiments with shop lights, heat mats, flats, soil blocks, and other things. Another reason I want to do this is that it is important to know how to grow food.
Sunday, March 1, 2009
Twist Marking Gauges

Here are a pair of twist marking gauges I made last year. The one on the left is made from mahogany and the other is made from walnut. A marking gauge is used in woodworking to make layout marks in wood, especially for cutting dovetail joints. To use this gauge, you measure from the sharp point blade to the edge of the marker block with light dot on it. Then you set the marker block by twisting it. It holds really secure. Other marking gauges use a thumbscrew. I saw the article in the December 1994, Issue #42 of American Woodworker. The article on how to make was written by Frank Klausz. I saw Frank at a woodworking show a few years back and got to see his famous European style workbench up close. He is a great teacher and a master woodworker. I really like making wooden hand tools. I will post pictures of more tools in the next few weeks as I get around to taking pictures of them.
Hydroponic Water Farm

This weekend I decided to buy a small hydroponic system from Garden Indoors. They are a distributor for Hydrofarm products. I have been wanting to try hydroponics for a while now and have been searching the internet and watching YouTube videos. It appears like an exact science and I wanted to build something from spare buckets, tubes, wood chips and a pump. I decided against that idea for now and I would rather learn from an established system. It makes more sense. Garden Indoors was really helpful and answered all my questions. It was a little expensive, but sometimes it is worth it. Trial and error sometimes can be more expensive and frustrating in the long run. I am sure that I will learn from this system and be able to build bucket systems in the future. I plan to grow a cherry tomato plant in this. I am starting seedlings right now in rockwool for transplanting into this container in about 2 weeks. I will be posting progress on how it goes.
Thursday, February 26, 2009
Boston Whaler Restoration

Back in 2002, I saw an ad in Yahoo for a 1968 , 13’ Boston Whaler Sport for sale. I called and said I was interested and sent the seller a deposit to hold the boat. That weekend, my Dad and I made a 350 mile round trip to Red Lion, PA on a Sunday afternoon to look at the boat. I knew if the hull was sound, nothing else mattered to me and could be restored based on what I read on the continuous wave website. I had bought a new trailer because I knew the existing trailer was not going to make it back. For $500, this is the boat we picked up that day. A 1968 13’ Boston Whaler with serial number intact. A gentleman and his two brothers helped lift the boat on to the new trailer and we towed it home behind my 1992 Honda Accord with 204,000 miles on it. The seller told me that after I called him for the boat, 5 other people called for it too. It was a great buy as the hull for this age was in very good condition. Minor fiberglass repairs were needed but overall it was great. Lots of work went into this boat as you will see in my Flickr Boston Whaler page here.

Natoma Skiff - 15' Rowboat

I also have built several boats over the years. I started around 1986, when I attended a 1 week boatbuilding course at the Center for Wooden Boats in Seattle. The class was taught by Simon Watts. We built a traditional cedar lapstrake planked rowing scull joined with copper rivets and included steam bent ribs. When I returned home, I only built glued lapstrake boats and 1 cedar strip boat. I would love to someday build an Adirondack Guideboat, but before I do, I have to start using the boat I have more to justify that. I have to admit, sometimes it is more fun to build than to use. I have more detailed pictures of the building of a Natoma Skiff at Flickr.
This 15' boat is a very fast boat at about 74 lbs. Last October, I rowed with a friend of mine who has a Steve Kaulback 15' Kevlar Adirondack Guideboat, which is also about 70 lbs., but I could not keep up with him. I think the kevlar guideboat built by Steve Kaulback is the nicest and fastest non-scull rowing craft around.
I would love to get one someday. They are about $3800 though.
Pencil Drawings

I started doing pencil drawings in early 2008 after reading books by Betty Edwards and Lee Hammond. I use the 1/2" or 1" grid method to transfer the image. This has really helped. For more of my pencil drawings, you can view my portfolio on Art Bistro.
My ArtBistro Page
My brother Gib is a professional graphic artist and his work is tremendous. To see more of his work, please visit his portfolio here:
Gib's ArtBistro Page
Basement Mural

This is my first attempt at painting a large wall mural. I used acrylic paint. I used brushes and an airbrush. I was thinking about doing this since the summer of 2008. I finally decided to do during my holiday vacation week at the end of 2008. It took me about 1 month to complete. I used the grid method to transfer the small image to a large 4' wide by 3" high image. My son James really loves Star Wars and so do I. I really liked this image of Yoda, so I thought it would look good on the basement playroom wall.
One thing I really had to overcome on this project was procrastination. I used a blank monthly calendar and worked a little each day. After I completed I would make off the calendar with a red "X". After I got started, I kept it going to not break the chain. Once I got painting, the time just went very quickly. When I start drawing or painting, it is like entering another world. I recommend art to anyone whether you can draw or not. There are so many great resources on the internet to help get you started or see what others are doing.
I made my first video for YouTube that shows the progression from bare wall to finished mural.
Subscribe to:
Comments (Atom)

